
Your Substack lives at yourname.substack.com. That works fine until you start caring about the domain in your bio, the domain readers screenshot, and the domain that shows up when someone links to your best post from a big publication. At that point, the free subdomain starts costing you something you can’t get back later: the SEO equity and brand recognition that should have been building under your own name from day one.
A custom domain on Substack moves your publication to a URL you own, like yourname.com, while keeping Substack’s editor, email delivery, and subscriber tools exactly as they are. It’s a one-time setup, a one-time fee, and about 15 minutes of DNS work that trips up more writers than it should.
Table of Contents
- What a Custom Domain on Substack Actually Does
- Is a Custom Domain Worth It for Your Substack
- What You Need Before You Start
- How to Set Up a Custom Domain on Substack, Step by Step
- Common Setup Problems and How to Fix Them
- Custom Domain and Substack SEO
- Keeping the Momentum After You Migrate
- When to Buy a Custom Domain (and When to Wait)
- Quick Answers to Common Questions
What a Custom Domain on Substack Actually Does
Every Substack publication gets a free subdomain automatically: yourname.substack.com. A custom domain replaces that address with one you control, typically something you already own or buy for a few dollars a year from a registrar like Namecheap or Google Domains. Substack still hosts everything, sends every email, and runs the editor. Only the address in the browser bar changes.
This is different from migrating off Substack entirely. You’re not exporting your list and rebuilding on Ghost or WordPress. You’re pointing your own domain at Substack’s servers so the platform you already use shows up under a name you own instead of one you’re renting.
Think of it the way a restaurant thinks about renting a storefront versus buying the building. The food, the staff, and the customers are identical either way. What changes is who benefits when the location becomes valuable. Every guest post, every mention from a bigger newsletter, every search ranking your writing earns builds equity somewhere. A custom domain decides whether that somewhere is you or Substack.
Substack Subdomain vs. Custom Domain
| Free Substack Subdomain | Custom Domain | |
|---|---|---|
| Example URL | yourname.substack.com | yourname.com |
| Setup cost | $0 | $50 one-time |
| Ongoing cost | $0 | Domain renewal (~$10-20/year, paid to your registrar, not Substack) |
| Who owns the SEO equity | Substack | You |
| Setup time | None, it’s automatic | ~15 minutes plus DNS propagation (up to 48 hours) |
| Portability if you ever leave Substack | Low, backlinks point at substack.com | High, backlinks already point at your domain |
| Requires technical steps | No | Yes, one DNS record |
Practical rule: if you’d be upset to lose every backlink pointing at your publication, you already know your answer. If you’re three posts in and still deciding whether this is a real project, the subdomain is fine for now.
Is a Custom Domain Worth It for Your Substack
This is the question people actually type into Google before “how do I set it up,” and it deserves a straight answer instead of a shrug.
The SEO Case for Owning Your Domain
Every backlink, every citation from a bigger publication, every bit of domain authority your writing earns while you’re on the free subdomain accrues to substack.com, not to you. As one writer who made the switch put it, if Substack ever changes its terms, raises fees dramatically, or you decide to move to Ghost or WordPress five years from now, your content is already indexed under your own domain. You export, you redirect, and you keep the SEO value you built. Do that same move from a substack.com subdomain and you start over.
There’s a second, quieter reason: a domain in your own name reads as more established to anyone evaluating whether to trust a newsletter enough to pay for it. Sponsors and partners notice too.
The Real Tradeoffs
The honest downside, covered in the same piece, is that you give up Substack’s own domain authority. Substack.com is a large, well-indexed site, and a brand-new custom domain starts from nothing. You also lose placement in Substack’s Discover tab tied to the substack.com domain structure, and there’s a real, if usually temporary, dip while your new domain gets crawled and indexed for the first time.
Neither tradeoff is a reason to avoid a custom domain if you’re serious about the publication for the long haul. Both are reasons not to buy one on day three, before you know if you’re going to stick with weekly publishing.
What You Need Before You Start
Three things, all confirmed on Substack’s own setup documentation:
- Publication owner or group admin access. Only the owner or a group administrator can connect a custom domain. If you run a multi-author publication and you’re not the owner, you’ll need them to do this step or grant you admin access first.
- $50, paid once to Substack. This turns on the custom domain feature permanently for that publication. After that, you can add, remove, or change custom domains at no additional charge.
- A domain you already own, or one you’re about to buy. Substack doesn’t sell domains. Buy yours from any registrar (Namecheap, Google Domains, Cloudflare Registrar, GoDaddy) before starting the in-app setup, since you’ll need to log into that registrar’s dashboard partway through.
One format requirement that surprises people: Substack requires your publication to be hosted on a subdomain-style address such as www.yourname.com, not the bare root domain yourname.com. You can still market the bare domain; you just add a redirect from the root to the www version, which most registrars support in a couple of clicks.
How to Set Up a Custom Domain on Substack, Step by Step
Getting Your CNAME from Substack
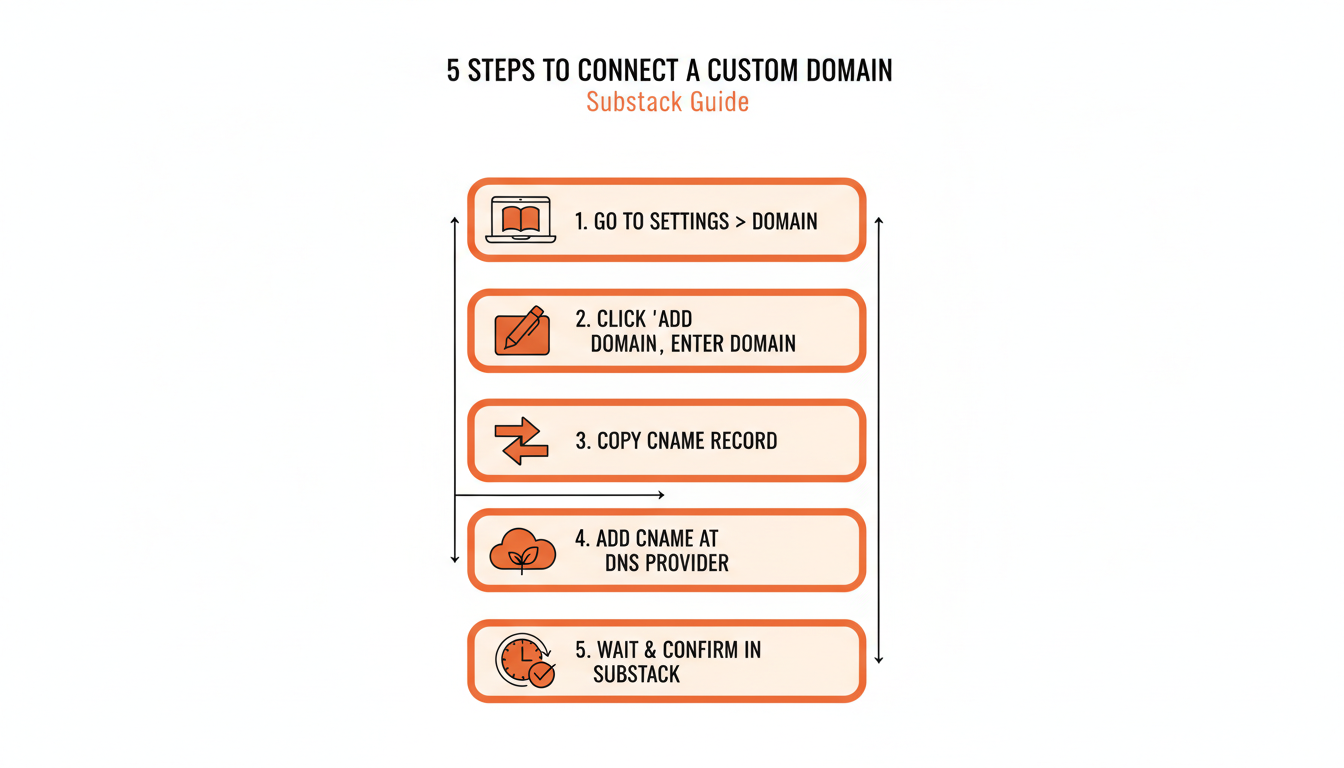
Open your publication’s Settings page and click Domain in the left navigation. Click Add custom domain, then enter the domain you want to use (remember: the www version, like www.yourname.com). Substack generates a CNAME record on the spot and shows it to you on screen. Don’t close this tab yet, you’ll need to copy that exact value in the next step.
Adding the CNAME at Your DNS Provider
Log into whichever service manages your domain’s DNS. That might be your registrar (Namecheap, GoDaddy) or a separate DNS host (Cloudflare, if you’re using it for anything else on that domain). Find the DNS management section, add a new record, and set:
- Type: CNAME
- Name/Host: the subdomain Substack gave you (usually just
www) - Target/Points to: the exact value Substack showed you
Different registrars label these fields differently. “Name” might show up as “Host” or “Subdomain.” “Target” might be “Points to” or “Value.” The concept is identical everywhere: you’re telling your domain’s DNS to route traffic for that address to Substack’s servers.
Practical rule: copy and paste the CNAME target exactly as Substack shows it. A single missing period or extra space is the single most common reason this setup fails on the first try.
Save the record, go back to Substack, and click to verify or confirm the connection. If DNS has already propagated, you’ll see it go live immediately. Usually it takes longer, which is the next section.
📅 Struggling to stay consistent on Substack?
WriteStack's Smart Scheduling lets you batch and queue Notes in minutes. Grow on Substack without burning out.
Explore Smart SchedulingOnce it does confirm, open your new domain in a private browser window (not one where you’re logged into Substack, to avoid a cached redirect) and check that a real post loads, not just the homepage. Click through to your about page and one archived post too. Substack handles the redirect logic automatically, but it’s worth seeing it work with your own eyes before you start promoting the new address anywhere.
Common Setup Problems and How to Fix Them
DNS Propagation Delays
DNS changes don’t happen instantly across the internet. Substack tells you to expect up to 48 hours, and that’s accurate, though most propagate within an hour or two. If your domain isn’t resolving yet, check the actual propagation status at a tool like dnschecker.org or whatsmydns.net rather than repeatedly re-adding the record in Substack, which won’t speed anything up. If it’s still not resolving after 48 hours, go back and check the CNAME value character by character against what Substack originally gave you.
The Cloudflare Proxy Trap
This is the single most common setup failure among writers using Cloudflare to manage DNS. Cloudflare defaults new records to “proxied,” shown as an orange cloud icon, which routes traffic through Cloudflare’s own servers instead of pointing directly at Substack. Substack’s custom domain feature needs a direct connection.
Find the CNAME record you just created in Cloudflare’s dashboard and click the cloud icon until it turns grey and says “DNS only.” That one click fixes a large share of “my domain still isn’t working” support tickets.
Custom Domain and Substack SEO
A custom domain doesn’t automatically boost your search rankings. What it does is redirect where your future rankings accrue. Every post you publish after switching gets indexed under your domain instead of a subdomain you don’t control, and every backlink someone builds to your writing points at an address that’s yours permanently.
It also doesn’t touch your subscriber experience in any way that matters day to day: open rates, email deliverability, and the sending address are unaffected, because Substack still sends every email from its own infrastructure regardless of which domain your publication displays. The custom domain changes what shows in a browser’s address bar and what search engines index, not how mail gets delivered.
One real limitation worth knowing before you switch: Substack’s own Discover and recommendation features are built around the substack.com domain structure, and writers report reduced visibility there after moving to a custom domain. If a meaningful share of your growth currently comes from Discover, weigh that against the long-term SEO ownership argument before switching.
Keeping the Momentum After You Migrate
Here’s the part that actually determines whether a custom domain was worth the $50: what you do in the weeks right after. The SEO case for owning your domain only pays off if you keep publishing at the same pace, so search engines have a growing, consistent body of content to index and link to under your new address. A domain switch followed by three quiet weeks wastes the setup more than staying on the subdomain would have.
This is where most writers actually lose the thread, not because they don’t know they should keep posting, but because the migration itself eats the week they were supposed to spend writing. WriteStack exists for exactly that gap: load a week or two of Substack Notes into the Notes generator in one sitting, right after you finish the domain setup, and they go out on schedule even during the week you’re distracted by DNS records.
The part most writers don’t expect: WriteStack is the only Substack tool that also schedules chat posts, not just Notes, and it benchmarks your publication’s Notes performance against other Substack writers instead of just showing your own numbers in isolation. After a domain migration, that benchmark is the fastest way to see whether the switch actually changed anything, rather than guessing from vibes three months later.
Set up a batch of Notes the same day you connect your domain, before the “I’ll get to it later” week starts. That single habit protects more of the SEO value from the migration than any DNS setting does.
When to Buy a Custom Domain (and When to Wait)
Buy one once two things are both true: you’ve published consistently for at least a month or two, and you’ve decided this publication is a real, ongoing project rather than an experiment. Buying a domain on day one, before you know if you’ll stick with weekly writing, means you’re paying $50 to solve a problem you don’t have yet.
Wait if you’re still finding your niche or testing whether Substack is the right platform at all. Switch once the writing habit is solid, because that’s the point where every future post starts building equity you keep regardless of what happens to Substack as a company.
Turn on Notes scheduling the same week you commit to a custom domain, and the two decisions reinforce each other: the domain protects the SEO value of what you write, and a consistent Notes schedule is what keeps growth from stalling right when your new domain needs fresh, regularly indexed content the most.
Quick Answers to Common Questions
Does a custom domain cost anything ongoing? Substack’s $50 fee is one-time. You’ll still pay your domain registrar’s annual renewal, typically $10-20/year, but that’s a cost you’d have with a domain on any platform, not something Substack adds.
Can I remove or change my custom domain later? Yes, once you’ve paid the one-time fee, you can add, remove, or swap custom domains at no additional charge.
Will my email still send from @substack.com? Yes. Regardless of which domain your publication displays, Substack sends every subscriber email from its own sending infrastructure. That part doesn’t change.
Does a custom domain affect Substack Discover placement? It can reduce it. Discover and recommendations are structured around the substack.com domain, and some writers see less Discover traffic after switching. Weigh this against your growth mix before migrating.
What if I want to leave Substack entirely someday? A custom domain makes that dramatically easier. Your content is indexed under a domain you own, so a future platform migration means exporting your content and redirecting, not starting your search rankings from zero.
Do I need to redo my custom domain setup if I switch DNS providers? Yes, if you move your domain’s DNS management to a different provider (say, from your registrar’s default DNS to Cloudflare), you’ll need to re-add the same CNAME record at the new provider. The record itself doesn’t change, only where it lives.
Getting the domain connected is a 15-minute task with a DNS wait attached. What actually determines whether it was worth doing is whether you keep publishing at the same pace right through the switch. Queue your next few weeks of Notes before you touch a single DNS setting, and the migration becomes a non-event instead of the thing that quietly stalled your momentum for a month.